Last modified: May 25, 2010
Contents
1 - Summary
2 - Dependencies
3 - Smartmontools installation
4 - Smartctl examples
5 - Service configuration
6 - Service check
1 - Summary
This guide will show how to install smartmontools in Windows. Smartmontools
can run tests can run tests to monitor the SMART of hard disks. This has been
tested in Windows NT4, 2000, XP and 2003 using ATA and SATA hard drives.
2 - Dependencies
You will need to have Windows configured to send emails using Blat. Also, it's
helpful to know what type of hard disk the computer has. I'm not sure how to do
this in Windows NT4, but in the rest of the operating systems you can find this
out by doing the following. Type the following in at the Run button on the Start
Menu. This will open the device management console.
devmgmt.msc
Expand Disk drives to find the hard disks in the computer.
 Now, with the model of the hard drives find out if they are ATA, SCSI or SAT.
3 - Smartmontools installation
Download the smartmontools Windows package at http://smartmontools.sourceforge.net/.
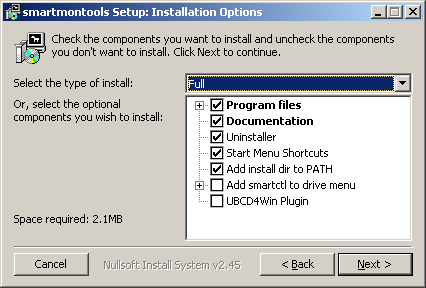
Run the installer and keep the type of install set to Full. I set the
destination folder to C:\Program Files\smartmontools.
Now, with the model of the hard drives find out if they are ATA, SCSI or SAT.
3 - Smartmontools installation
Download the smartmontools Windows package at http://smartmontools.sourceforge.net/.
Run the installer and keep the type of install set to Full. I set the
destination folder to C:\Program Files\smartmontools.
 Register the smartmontools service by clicking Service install, eventlog, 30min.
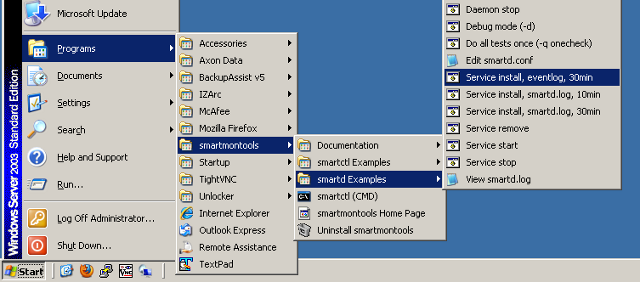 After running this you will get a message that says the smartd service has
been successfully registered.
4 - Smartctl examples
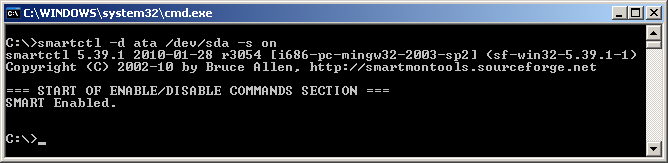
Here are some basic examples of things you can find with smartctl. The command
shown below enables SMART on the hard disks.
After running this you will get a message that says the smartd service has
been successfully registered.
4 - Smartctl examples
Here are some basic examples of things you can find with smartctl. The command
shown below enables SMART on the hard disks.
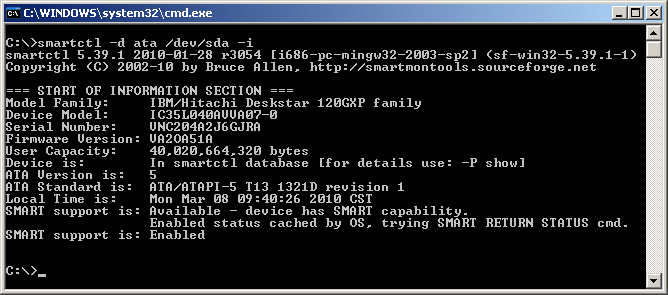
 This command prints the device model number, serial number, firmware version,
and ATA Standard version/revision information.
This command prints the device model number, serial number, firmware version,
and ATA Standard version/revision information.
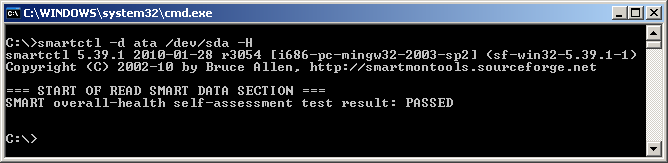
 This command prints the SMART health status.
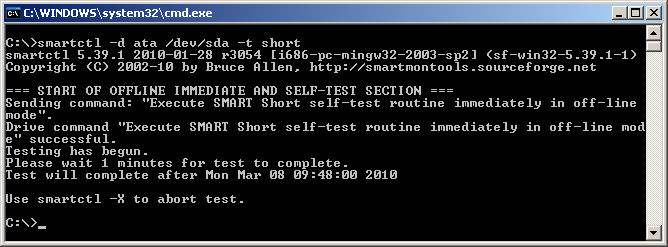
 This command runs a SMART short self test.
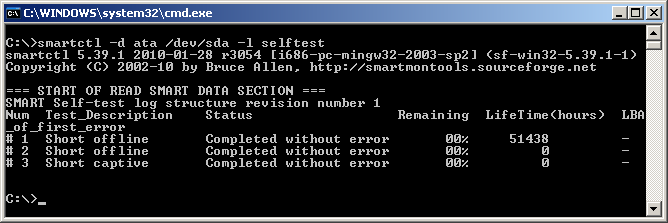
 This command lists the log of selftest results.
 5 - Service configuration
Set it so that the smartmontools service will start when the system starts up.
In Windows NT4 go to the Control Panel and double-click on Services. In the
other operating systems open the services management console by typing the
following at the Run button on the Start Menu.
services.msc
Set the SmartD service to have it's startup type to be Automatic.
5 - Service configuration
Set it so that the smartmontools service will start when the system starts up.
In Windows NT4 go to the Control Panel and double-click on Services. In the
other operating systems open the services management console by typing the
following at the Run button on the Start Menu.
services.msc
Set the SmartD service to have it's startup type to be Automatic.
 The configuration file that the smartmontools service will use is the
following file.
C:\Program Files\smartmontools\bin\smartd.conf
You can create your own configuration file. Here is a simple example. This
will disable Autosave and will schedule a short self-test between 8-9 PM every
night and send warnings or errors to the email address provided. Scheduled
tests are run after the default scheduled device polling, which by default
is every thirty minutes after the smartmontools service is started.
/dev/sda -d ata -S off -s S/../.././20 -m notifcations@test.com -a
Navigate to C:\Program Files\smartmontools\bin and make a backup of the
smartd.conf file. Afterwards, edit the smartd.conf file.
Open a command prompt and start the smartd service.
The configuration file that the smartmontools service will use is the
following file.
C:\Program Files\smartmontools\bin\smartd.conf
You can create your own configuration file. Here is a simple example. This
will disable Autosave and will schedule a short self-test between 8-9 PM every
night and send warnings or errors to the email address provided. Scheduled
tests are run after the default scheduled device polling, which by default
is every thirty minutes after the smartmontools service is started.
/dev/sda -d ata -S off -s S/../.././20 -m notifcations@test.com -a
Navigate to C:\Program Files\smartmontools\bin and make a backup of the
smartd.conf file. Afterwards, edit the smartd.conf file.
Open a command prompt and start the smartd service.
 The service has successfully started.
6 - Service check
Reboot your computer. Log in like normal and check to see that the
smartmontools service is running. Open the services management console by
typing the following at the Run button on the Start Menu.
services.msc
Check to make sure that the smartmontools service has started.
The service has successfully started.
6 - Service check
Reboot your computer. Log in like normal and check to see that the
smartmontools service is running. Open the services management console by
typing the following at the Run button on the Start Menu.
services.msc
Check to make sure that the smartmontools service has started.
 That's it, now you have smartmontools running in Windows.
|
