Last modified: Oct. 12, 2012
Contents
1 - Summary
2 - Dependencies
3 - Zabbix server installation
4 - Service configuration
5 - View status on website
6 - Service check
1 - Summary
This guide will show you how to install the Zabbix Server in FreeBSD. The
Zabbix Server is the server software that installs on a server and receives
information from network devices. Zabbix is an open source monitoring solution.
This has been tested in FreeBSD 9.0 amd64.
2 - Dependencies
Install the apache package. Apache is a web server that will host the web pages
that display the server data.
# sudo pkg_add -r apache22
Password:
Find where the apache daemon was installed to.
# pkg_info -L apache-2.2.* | grep sbin
/usr/local/sbin/ab
/usr/local/sbin/apachectl
/usr/local/sbin/apxs
/usr/local/sbin/checkgid
/usr/local/sbin/dbmmanage
/usr/local/sbin/envvars
/usr/local/sbin/htcacheclean
/usr/local/sbin/htdbm
/usr/local/sbin/htdigest
/usr/local/sbin/htpasswd
/usr/local/sbin/httpd
/usr/local/sbin/httxt2dbm
/usr/local/sbin/logresolve
/usr/local/sbin/rotatelogs
/usr/local/sbin/split-logfile
Find the options for the apache service.
# pkg_info -L apache-2.2.* | grep rc.d
/usr/local/etc/rc.d/apache22
/usr/local/etc/rc.d/htcacheclean
# grep -e 'bool\|str' /usr/local/etc/rc.d/apache22
# apache22_enable (bool): Set to "NO" by default.
# apache22_profiles (str): Set to "" by default.
# apache22limits_enable (bool):Set to "NO" by default.
# apache22_flags (str): Set to "" by default.
# apache22limits_args (str): Default to "-e -C daemon"
# apache22_http_accept_enable (bool): Set to "NO" by default.
# apache22_fib (str): Set an altered default network view for apache
Edit /etc/rc.conf.local so that the apache service will start when the system
starts up. Somewhere in the file add the following.
apache22_enable="YES"
# sudo vi /etc/rc.conf.local
Password:
Find where the configuration file should be put.
# grep httpd.conf /usr/local/etc/rc.d/apache22
required_files=/usr/local/etc/apache22/httpd.conf
# strings /usr/local/sbin/httpd | grep httpd.conf
-D SERVER_CONFIG_FILE="etc/apache22/httpd.conf"
etc/apache22/httpd.conf
directive in your httpd.conf file to list a non-root
You will need to modify the original configuration file. Add the following. In
this example, I set the websites to be stored in an alernate directory. By the
way, there is already a group named it which includes an account for the web
developers.
Listen 0.0.0.0:80
ServerName server.test.com
DocumentRoot "/data/websites/test/server"
<Directory "/data/websites/test/server">
Options Indexes FollowSymLinks
AllowOverride None
Order allow,deny
Allow from all
</Directory>
ErrorLog syslog
LogLevel warn
LogFormat "%v:%p %h %l %u %t \"%r\" %>s %b \"%{Referer}i\" \"%{User-Agent}i\"" commonvhost
CustomLog "|/usr/bin/logger -t httpd" commonvhost
NameVirtualHost *:80
NameVirtualHost *:443
<VirtualHost *:80>
ServerName server.test.com
Redirect / https://server.test.com/
</VirtualHost>
<VirtualHost *:443>
ServerName server.test.com
ServerAdmin root@localhost
DocumentRoot /data/websites/test/server
</VirtualHost>
# pkg_info -L apache-2.2.* | grep httpd.conf
/usr/local/share/examples/apache22/httpd.conf
# sudo cp /usr/local/etc/apache22/httpd.conf /usr/local/etc/apache22/httpd.conf.example
Password:
# sudo vi /usr/local/etc/apache22/httpd.conf
Password:
# sudo mkdir -p /data/websites/test/server
Password:
# sudo mkdir -p /data/logs/httpd
Password:
# grep ^www /etc/passwd
www:*:80:80:World Wide Web Owner:/nonexistent:/usr/sbin/nologin
# sudo chown -R root:it /data/logs/httpd
Password:
# sudo chmod -R 755 /data/logs/httpd
Password:
Copy in the SSL certificate files. Create the configuration file to have the
following for SSL.
Listen 0.0.0.0:443 http
AddType application/x-x509-ca-cert .crt
AddType application/x-pkcs7-crl .crl
SSLSessionCache "shmcb:/var/run/ssl_scache(512000)"
SSLSessionCacheTimeout 300
SSLMutex "file:/var/run/ssl_mutex"
<VirtualHost _default_:443>
ErrorLog syslog
LogLevel warn
SSLEngine on
SSLCipherSuite ALL:!ADH:!EXPORT56:RC4+RSA:+HIGH:+MEDIUM:+LOW:+SSLv2:+EXP:+eNULL
SSLCertificateFile "/usr/local/etc/apache22/ssl/domain.cer"
SSLCertificateKeyFile "/usr/local/etc/apache22/ssl/domain.key.alt"
SSLCertificateChainFile "/usr/local/etc/apache22/ssl/domain.crt"
<FilesMatch "\.(cgi|shtml|phtml|php)$">
SSLOptions +StdEnvVars
</FilesMatch>
BrowserMatch ".*MSIE.*" \
nokeepalive ssl-unclean-shutdown \
downgrade-1.0 force-response-1.0
CustomLog "|/usr/bin/logger -t httpd" commonvhost
</VirtualHost>
# sudo mkdir /usr/local/etc/apache22/ssl
Password:
# grep ^Include /usr/local/etc/apache22/httpd.conf
Include etc/apache22/Includes/*.conf
# sudo vi /usr/local/etc/apache22/Includes/ssl.conf
Password:
Configure syslog appropriately.
Install the dependencies needed to install the php package. We will install the
port in order to get the php module needed for apache.
# sudo pkg_add -r portupgrade
Password:
# sudo portsnap fetch extract
Password:
There is an entry in /usr/ports/UPDATING regarding pkg-config.
# vi /usr/ports/UPDATING
# sudo portupgrade -fo devel/pkgconf pkg-config-\*
Password:
# sudo pkg_add -r m4
Password:
# sudo pkg_add -r help2man
Password:
# sudo pkg_add -r gmake
Password:
There is an entry in /usr/ports/UPDATING regarding pcre.
# vi /usr/ports/UPDATING
# sudo portupgrade devel/pcre
Password:
# sudo pkg_add -r libxml2
Password:
# sudo portupgrade -fo devel/pkgconf pkg-config-\*
Password:
# cd /usr/ports/lang/php53/
Select only the following.
[*] APACHE Build Apache module
[*] CGI Build CGI version
[*] CLI Build CLI version
[*] SUHOSIN Suhosin protection system
# sudo make config
Password:
# sudo make
Password:
# sudo make install
Password:
# sudo make clean
Password:
# cd ~
Comment out the following in the apache config.
LoadModule php5_module libexec/apache22/libphp5.so
# sudo vi /usr/local/etc/apache22/httpd.conf
Password:
Create the following file for php for apache.
LoadModule php5_module libexec/apache22/libphp5.so
DirectoryIndex index.php
AddType application/x-httpd-php .php
AddType application/x-httpd-php-source .phps
# grep ^Include /usr/local/etc/apache22/httpd.conf
Include etc/apache22/Includes/*.conf
# sudo vi /usr/local/etc/apache22/Includes/php.conf
Password:
You will need to modify the original configuration file. Have the following.
You can find a list of the supported timezones at this page. By the way, there
is already a group named it which includes an account for the web developers.
http://us.php.net/manual/en/timezones.php
short_open_tag = On
max_execution_time = 300
max_input_time = 300
error_reporting = E_ALL & ~E_DEPRECATED
log_errors_max_len = 0
error_log = /data/logs/php/errors.log
post_max_size = 16M
date.timezone = your_timezone
session.save_path = "/tmp"
# pkg_info -L php53-5.3.* | grep -i php.ini
/usr/local/etc/php.ini-development
/usr/local/etc/php.ini-production
/usr/local/include/php/main/php_ini.h
# sudo cp /usr/local/etc/php.ini-production /usr/local/etc/php.ini
Password:
# sudo chmod u+w /usr/local/etc/php.ini
Password:
# sudo vi /usr/local/etc/php.ini
Password:
# sudo mkdir /data/logs/php
Password:
# sudo touch /data/logs/php/errors.log
Password:
# sudo chown -R root:it /data/logs/php/
Password:
# sudo chmod -R 777 /data/logs/php/
Password:
Install the mysql-server package. MySQL is a database server that will store
the information the Zabbix Agents send from the network devices.
# sudo pkg_add -r mysql55-server
Password:
Find where the mysql daemon was installed to.
# pkg_info -L mysql-server-5.5.* | grep mysqld
/usr/local/man/man1/mysqld_multi.1.gz
/usr/local/man/man1/mysqld_safe.1.gz
/usr/local/man/man1/mysqldumpslow.1.gz
/usr/local/man/man8/mysqld.8.gz
/usr/local/bin/mysqld_multi
/usr/local/bin/mysqld_safe
/usr/local/bin/mysqldumpslow
/usr/local/lib/mysql/libmysqld.a
/usr/local/libexec/mysqld
/usr/local/share/mysql/mysqld_multi.server
Find the options for the mysql service.
# pkg_info -L mysql-server-5.5.17 | grep rc.d
/usr/local/etc/rc.d/mysql-server
# grep -e 'bool\|str' /usr/local/etc/rc.d/mysql-server
# mysql_enable (bool): Set to "NO" by default.
# mysql_limits (bool): Set to "NO" by default.
# mysql_dbdir (str): Default to "/var/db/mysql"
# mysql_pidfile (str): Custum PID file path and name.
# mysql_args (str): Custom additional arguments to be passed
Edit /etc/rc.conf.local so that the mysql service will start when the system
starts up. Somewhere in the file add the following.
mysql_enable="YES"
mysql_dbdir="/data/databases/mysql"
mysql_pidfile="/data/databases/mysql/mysqld.pid"
mysql_args="--socket=/data/databases/mysql/mysql.sock"
# sudo vi /etc/rc.conf.local
Password:
Find where the configuration file should be put.
# pkg_info -L mysql-server-5.5.* | grep rc.d
/usr/local/etc/rc.d/mysql-server
# grep my.cnf /usr/local/etc/rc.d/mysql-server
command_args="-c -f /usr/local/bin/mysqld_safe --defaults-extra-file=${mysql_dbdir}/my.cnf \
--user=${mysql_user} --datadir=${mysql_dbdir} --pid-file=${pidfile} ${mysql_args}"
# strings /usr/local/libexec/mysqld | grep my.cnf
Port number to use for connection or 0 to default to, my.cnf, $MYSQL_TCP_PORT, \
/etc/services, built-in default (3306), whatever comes first
InnoDB: mysqld and edit my.cnf so that newraw is replaced
InnoDB: my.cnf and restart the database.
InnoDB: Shut down mysqld and edit my.cnf so that newraw is replaced with raw.
InnoDB: you should now edit innodb_data_file_path in my.cnf back
InnoDB: missing. Have you edited innodb_data_file_path in my.cnf in an
InnoDB: You can set innodb_force_recovery=1 in my.cnf to force
InnoDB: You can try to recover the database with the my.cnf
InnoDB: your my.cnf matches the ibdata files that you have in the
InnoDB: my.cnf! Remember that InnoDB keeps all log files and all system
InnoDB: my.cnf.
InnoDB: the .ibd file, you can set innodb_force_recovery > 0 in my.cnf
InnoDB: the .ibd file, you can set innodb_force_recovery > 0 in my.cnf
InnoDB: To get mysqld to start up, set innodb_thread_concurrency in my.cnf
You will need to modify the original configuration file. Have the following. In
this example, I set the databases to be stored in an alternate directory using
InnoDB. By the way, there is already a group named it which includes an account
for the web developers. When mysql was installed, a user named mysql was
created.
[client]
socket = /data/databases/mysql/mysql.sock
[mysqld]
bind-address = 0.0.0.0
datadir = /data/databases/mysql
default-storage-engine = InnoDB
innodb_data_home_dir = /data/databases/mysql/ib_data
innodb_file_per_table
innodb_log_group_home_dir = /data/databases/mysql/ib_logs
key_buffer_size = 256M
log-error = /data/logs/mysqld/errors.log
socket = /data/databases/mysql/mysql.sock
user = mysql
[mysql]
no-auto-rehash
socket = /data/databases/mysql/mysql.sock
[mysqladmin]
socket = /data/databases/mysql/mysql.sock
[mysqldump]
quick
socket = /data/databases/mysql/mysql.sock
# grep mysql_dbdir /etc/rc.conf.local
mysql_dbdir="/data/databases/mysql"
# pkg_info -L mysql-server-5.5.* | grep \.cnf
/usr/local/share/mysql/my-huge.cnf
/usr/local/share/mysql/my-innodb-heavy-4G.cnf
/usr/local/share/mysql/my-large.cnf
/usr/local/share/mysql/my-medium.cnf
/usr/local/share/mysql/my-small.cnf
# sudo mkdir -p /data/databases/mysql
Password:
# sudo mkdir /data/databases/mysql/ib_data
Password:
# sudo mkdir /data/databases/mysql/ib_logs
Password:
# grep ^mysql /etc/passwd
mysql:*:88:88:MySQL Daemon:/var/db/mysql:/usr/sbin/nologin
# sudo chown -R mysql:mysql /data/databases/
Password:
# sudo cp /usr/local/share/mysql/my-large.cnf /data/databases/mysql/my.cnf
Password:
# sudo vi /data/databases/mysql/my.cnf
Password:
# sudo mkdir /data/logs/mysqld
Password:
# sudo touch /data/logs/mysqld/errors.log
Password:
# sudo chown -R root:it /data/logs/mysqld/
Password:
# sudo chmod -R 777 /data/logs/mysqld/
Password:
# grep ^mysql /etc/passwd
mysql:*:88:88:MySQL Daemon:/var/db/mysql:/usr/sbin/nologin
# sudo pw usermod mysql -d /data/databases/mysql
Password:
# sudo rm -fr /var/db/mysql/
Password:
# sudo ln -sf /data/databases/mysql/my.cnf /usr/local/etc/my.cnf
Password:
# sudo ln -sf /data/databases/mysql/mysql.sock /tmp/mysql.sock
Password:
Create the following script to create a few symlinks.
#!/bin/sh
echo=/bin/echo
ln=/bin/ln
$echo -n " creating symlinks"
$ln -sf /data/databases/mysql/my.cnf /usr/local/etc/my.cnf
$ln -sf /data/databases/mysql/mysql.sock /tmp/mysql.sock
exit 0
# sudo vi /usr/local/etc/rc.d/000-create_symlinks.sh
Password:
# sudo chmod 555 /usr/local/etc/rc.d/000-create_symlinks.sh
Password:
Start the mysql service.
# sudo /usr/local/etc/rc.d/mysql-server start
Password:
# su - root
# rehash
# logout
# sudo mysqladmin -u root password 'password'
Password:
Enter password:
# su - root
Password:
# echo `ifconfig $nic | grep inet | awk '{print $2}'` `hostname` \
`hostname -s` >> /etc/hosts
# logout
# sudo mysqladmin -u root -h server.test.com password 'password'
Password:
Enter password:
Install the following php packages.
# sudo pkg_add -r php5-gd
Password:
# sudo pkg_add -r php5-bcmath
Password:
# sudo pkg_add -r php5-xml
Password:
# sudo pkg_add -r php5-mbstring
Password:
# sudo pkg_add -r php5-mysql
Password:
# sudo pkg_add -r php5-ctype
Password:
# sudo pkg_add -r php5-snmp
Password:
# sudo pkg_add -r php5-sockets
Password:
# sudo pkg_add -r php5-session
Password:
# sudo pkg_add -r php5-dom
Password:
# sudo pkg_add -r php5-xmlreader
Password:
# sudo pkg_add -r php5-xmlwriter
Password:
# sudo pkg_add -r php5-gettext
Password:
# sudo pkg_add -r php5-mysqli
Password:
# sudo pkg_add -r php5-ldap
Password:
Install the following packages needed for zabbix.
# sudo pkg_add -r fping
Password:
# sudo pkg_add -r iksemel
Password:
# sudo pkg_add -r unixODBC
Password:
# sudo pkg_add -r libexecinfo
Password:
# sudo pkg_add -r curl
Password:
# sudo pkg_add -r openipmi
Password:
# sudo pkg_add -r libssh2
Password:
# sudo portupgrade -fo devel/pkgconf pkg-config-\*
Password:
3 - Zabbix server installation
Install the zabbix port as well as the zabbix frontend port.
# cd /usr/ports/net-mgmt/zabbix2-server/
Select only the following.
[*] CURL Support for web monitoring
[*] FPING Build/install fping for ping checks
[*] IPMI Support for IPMI checks
[*] JABBER Support for Jabber media type
[*] LDAP Support for LDAP server checks
[*] SSH Support for SSH-based checks
[*] MYSQL S(DB): MySQL database
[*] UNIXODBC S(ODBC): Use UnixODBC for ODBC support
# sudo make config
Password:
# sudo make
Password:
# sudo make install
Password:
# sudo make clean
Password:
# cd /usr/ports/net-mgmt/zabbix2-frontend/
Select only the following.
[*] MYSQL MySQL database
# sudo make config
Password:
# sudo make
Password:
# sudo make install
Password:
# sudo make clean
Password:
# cd ~
4 - Service configuration
Find where the zabbix daemon was installed to.
# pkg_info -L zabbix2-server-2.0.* | grep sbin
/usr/local/sbin/zabbix_server
Find the options for the zabbix service.
# pkg_info -L zabbix2-server-2.0.* | grep rc.d
/usr/local/etc/rc.d/zabbix_server
# grep -e 'bool\|str' /usr/local/etc/rc.d/zabbix_server
# zabbix_server_enable (bool): Set to NO by default. Set it to YES to
Edit /etc/rc.conf.local so that the zabbix service will start when the system
starts up. Somewhere in the file add the following.
zabbix_server_enable="YES"
# sudo vi /etc/rc.conf.local
Password:
Find where the configuration file should be put.
# pkg_info -L zabbix2-server-2.0.* | grep rc.d
/usr/local/etc/rc.d/zabbix_server
# grep \.conf /usr/local/etc/rc.d/zabbix_server
# Add the following lines to /etc/rc.conf.local or /etc/rc.conf to
required_files="/usr/local/etc/zabbix2/${name}.conf"
load_rc_config $name
# strings /usr/local/sbin/zabbix_server | grep zabbix_server.conf
/usr/local/etc/zabbix2/zabbix_server.conf
You will need to modify the original configuration file. Have the following.
ListenPort=10051
LogFile=/data/logs/zabbix/zabbix_server.log
LogFileSize=0
PidFile=/tmp/zabbix_server.pid
DBName=zabbix
DBUser=zabbix
DBPassword=password
DBSocket=/data/databases/mysql/mysql.sock
DBPort=3306
ListenIP=0.0.0.0
UnavailableDelay=60
AlertScriptsPath=${datadir}/zabbix/alertscripts
FpingLocation=/usr/local/sbin/fping
# pkg_info -L zabbix2-server-2.0.* | grep \.conf
/usr/local/etc/zabbix2/zabbix_server.conf.sample
# sudo cp /usr/local/etc/zabbix2/zabbix_server.conf.sample /usr/local/etc/zabbix2/zabbix_server.conf
Password:
# sudo cp /usr/local/etc/zabbix2/zabbix_server.conf /usr/local/etc/zabbix2/zabbix_server.conf.example
Password:
# sudo vi /usr/local/etc/zabbix2/zabbix_server.conf
Password:
# sudo mkdir /data/logs/zabbix
Password:
# sudo chown -R root:it /data/logs/zabbix/
Password:
# sudo chmod -R 777 /data/logs/zabbix/
Password:
Create the following file for zabbix for apache.
#
# Zabbix monitoring system php web frontend
#
<Directory "/data/websites/test/server">
Options FollowSymLinks
AllowOverride None
Order allow,deny
Allow from all
</Directory>
<Directory "/data/websites/test/server/include">
Order deny,allow
Deny from all
<files *.php>
Order deny,allow
Deny from all
</files>
</Directory>
<Directory "/data/websites/test/server/include/classes">
Order deny,allow
Deny from all
<files *.php>
Order deny,allow
Deny from all
</files>
</Directory>
# grep ^Include /usr/local/etc/apache22/httpd.conf
Include etc/apache22/Includes/*.conf
# sudo vi /usr/local/etc/apache22/Includes/zabbix.conf
Password:
Copy the zabbix web directory and set ownership and permissions. By the way,
there is already a group named it which includes an account for the web
developers. When apache was installed a user named www was created.
# pkg_info -L zabbix2-frontend-2.0.* | grep zabbix.conf.php
/usr/local/www/zabbix2/conf/zabbix.conf.php.example
# sudo cp -Rp /usr/local/www/zabbix2/ /data/websites/test/server/
Password:
# su - root
Password:
# rm -f /data/websites/test/server/conf/zabbix.conf.php.example
# logout
# grep ^www /etc/passwd
www:*:80:80:World Wide Web Owner:/nonexistent:/usr/sbin/nologin
# sudo chown -R www:it /data/websites/
Password:
# sudo chmod -R 774 /data/websites/
Password:
Create the database and user for zabbix. Afterwards, find the SQL statement
files and insert them.
# rehash
# mysql -u root -p
Enter password:
mysql> create database zabbix character set utf8;
mysql> create user 'zabbix'@'localhost' identified by 'password';
mysql> grant all on zabbix.* to zabbix;
mysql> flush privileges;
mysql> quit
# pkg_info -L zabbix2-server-2.0.* | grep "\.sql" | grep database | grep mysql
/usr/local/share/zabbix2/server/database/mysql/data.sql
/usr/local/share/zabbix2/server/database/mysql/schema.sql
/usr/local/share/zabbix2/server/database/mysql/images.sql
# mysql -u zabbix -p zabbix < /usr/local/share/zabbix2/server/database/mysql/schema.sql
Enter password:
# mysql -u zabbix -p zabbix < /usr/local/share/zabbix2/server/database/mysql/images.sql
Enter password:
# mysql -u zabbix -p zabbix < /usr/local/share/zabbix2/server/database/mysql/data.sql
Enter password:
Some system level changes need to be made relating to shared memory. Check to
see what the current page size is. Aftwards, check the current values for the
maximum number of pages available for shared memory and the maximum shared
memory segment sizes in bytes. Modify /etc/sysctl.conf to make the changes
permanent. This will increase the maximum number of pages available for shared
memory to be 8 GB and will increase the maximum amount of memory to 128 MB for
any cache related parameters in the zabbix server configuration.
# getconf PAGE_SIZE
4096
# sysctl -a | grep -E "shmall|shmmax"
kern.ipc.shmall: 131072
kern.ipc.shmmax: 536870912
Modify /etc/sysctl.conf to make the changes permanent. This will increase the
the maximum number of pages available for shared memory to be 8 GB and will
increase the maximum amount of memory to 128 MB for any cache related options
in the zabbix server configuration.
kern.ipc.shmall=2097152
kern.ipc.shmmax=134217728
# sudo vi /etc/sysctl.conf
Password:
# sudo /etc/rc.d/sysctl restart
Password:
# sysctl -a | grep -E "shmall|shmmax"
kern.ipc.shmall: 2097152
kern.ipc.shmmax: 134217728
Before starting the services, make sure that tcp ports 80, 443 and 10051 are
open in case you are running firewall software. Here are some sample rules.
tcp_services="{ 80, 443, 10051 }"
pass in on $ext_if proto tcp from any to ($ext_if) port $tcp_services flags S/SA keep state
# sudo cp /etc/pf.conf /etc/pf.conf.example
Password:
# sudo vi /etc/pf.conf
Password:
# sudo pfctl -f -n /etc/pf.conf
Password:
# su - root
Password:
# pfctl -F all && pfctl -f /etc/pf.conf
# logout
Start the apache service.
# sudo /usr/local/etc/rc.d/apache22 start
Password:
Start the zabbix service.
# sudo /usr/local/etc/rc.d/zabbix_server start
Password:
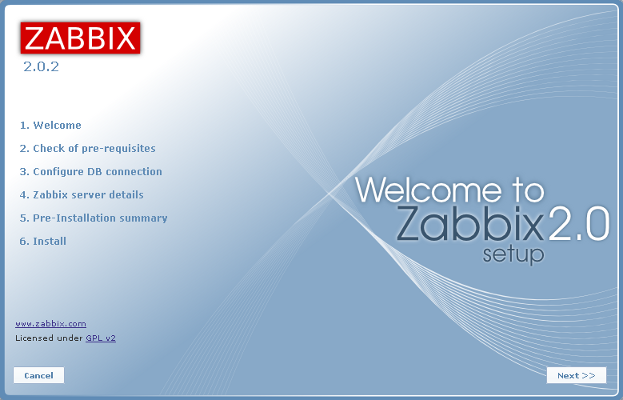
Navigate your web browser to https://server.test.com/. You will see the
screen. This is a wizard that installs the web frontend. Click on Next.
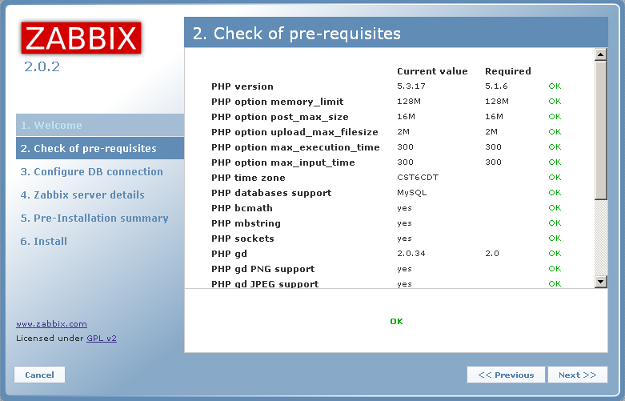
 The next screen shows the check of pre-requisites. Click on Next.
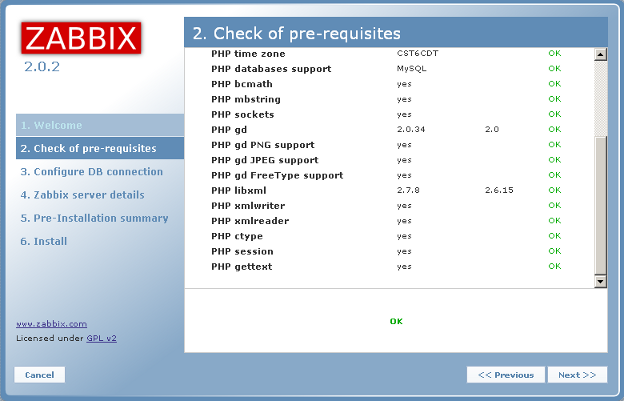
 Here is the rest of the pre-requisites.
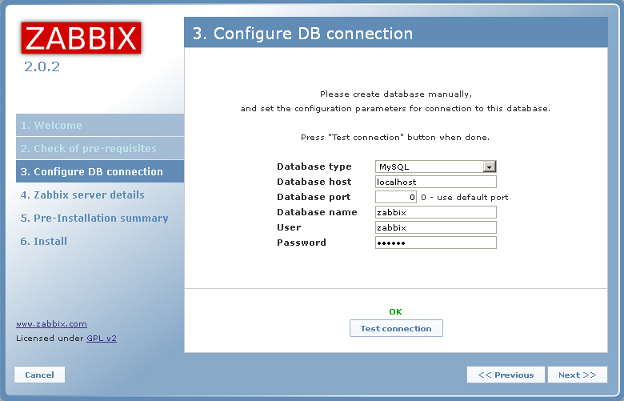
 The next screen shows the configuration for the database connection. You will
need to type in the zabbix database name, zabbix database username and zabbix
database password and then click on "Test connection." After that says OK,
click on Next.
The next screen shows the configuration for the database connection. You will
need to type in the zabbix database name, zabbix database username and zabbix
database password and then click on "Test connection." After that says OK,
click on Next.
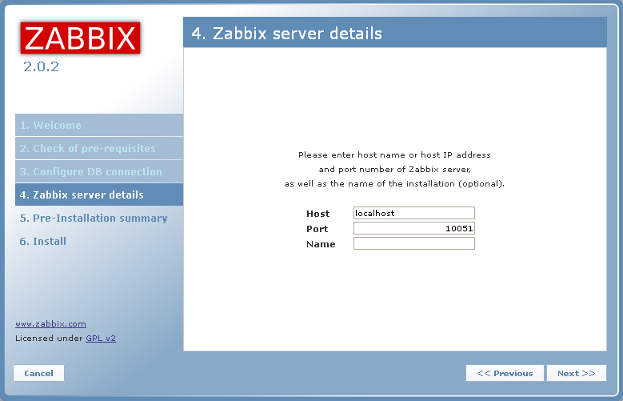
 The next screen shows the zabbix server information. You can just click on
Next.
The next screen shows the zabbix server information. You can just click on
Next.
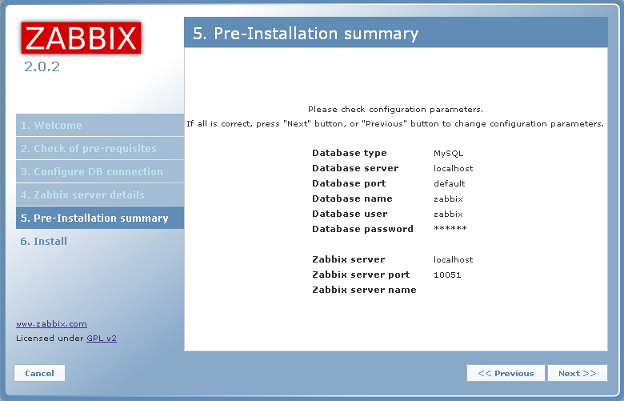
 The next screen shows configuration parameters. Click on Next.
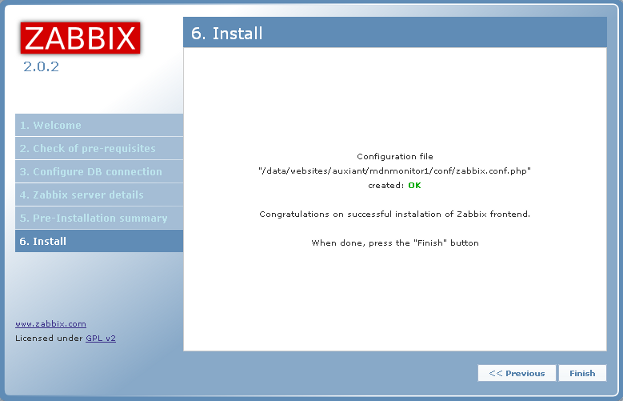
 The next screen shows if the configuration file is OK and shows that the web
frontend was installed successfully. Click on Finish.
The next screen shows if the configuration file is OK and shows that the web
frontend was installed successfully. Click on Finish.
 Navigate your web browser to https://server.test.com/. The default Login name
is Admin and the default Password zabbix. After logging in, you will be able to
change the Login name as well as the password.
5 - View status on website
Navigate your web browser to https://server.test.com/. Click on the link for
Server information - Zabbix. After you login, you will see the main screen
which is a dashboard or summary page.
6 - Service check
Reboot your computer. Log in like normal and check to see that the httpd,
mysqld and zabbix server services are running. That's it, now you have the
Zabbix Server running in FreeBSD.
# sudo shutdown -r now
Password:
# sudo /usr/local/etc/rc.d/apache22 status
Password:
apache22 is running as pid 2045.
# sudo /usr/local/etc/rc.d/mysql-server status
Password:
mysql is running as pid 1986.
# sudo /usr/local/etc/rc.d/zabbix_server status
Password:
zabbix_server is running as pid 1995 2016 2017 2018 2019 2020 2021 2022 2023
2024 2025 2026 2027 2028 2029 2030 2031 2032 2033 2034 2035 2036 2037 2038 2039
2040 2041.
Navigate your web browser to https://server.test.com/. The default Login name
is Admin and the default Password zabbix. After logging in, you will be able to
change the Login name as well as the password.
5 - View status on website
Navigate your web browser to https://server.test.com/. Click on the link for
Server information - Zabbix. After you login, you will see the main screen
which is a dashboard or summary page.
6 - Service check
Reboot your computer. Log in like normal and check to see that the httpd,
mysqld and zabbix server services are running. That's it, now you have the
Zabbix Server running in FreeBSD.
# sudo shutdown -r now
Password:
# sudo /usr/local/etc/rc.d/apache22 status
Password:
apache22 is running as pid 2045.
# sudo /usr/local/etc/rc.d/mysql-server status
Password:
mysql is running as pid 1986.
# sudo /usr/local/etc/rc.d/zabbix_server status
Password:
zabbix_server is running as pid 1995 2016 2017 2018 2019 2020 2021 2022 2023
2024 2025 2026 2027 2028 2029 2030 2031 2032 2033 2034 2035 2036 2037 2038 2039
2040 2041.
|
