Last modified: Nov. 17, 2012
Contents
1 - Summary
2 - Dependencies
3 - Install msmtp
4 - Msmtp configuration
5 - Shell script
6 - Zabbix configuration
1 - Summary
This guide will show you how to use msmtp with TLS/SSL capabilities for email
notifications in Zabbix Server in FreeBSD. Msmtp is an SMTP client used to send
email. Zabbix Server is the server software that installs on a server and
receives information from network devices. Zabbix is an open source monitoring
solution. This has been tested in FreeBSD 9.0 i386/amd64.
2 - Dependencies
Install following packages.
# cd ~
# sudo pkg_add -r ca_root_nss
Password:
# sudo pkg_add -r p5-LWPx-ParanoidAgent
Password:
# sudo pkg_add -r wget
Password:
# rehash
# wget --no-check-certificate https://github.com/bagder/curl/raw/master/lib/mk-ca-bundle.pl
# perl mk-ca-bundle.pl
# sudo chown root:wheel ca-bundle.crt
Password:
# sudo chmod 555 ca-bundle.crt
Password:
# sudo mv ca-bundle.crt /usr/local/etc/
Password:
# rm -f certdata.txt mk-ca-bundle.pl
# sudo pkg_add -r libidn
Password:
# sudo pkg_add -r portupgrade
Password:
# sudo portsnap fetch extract
Password:
There is an entry in /usr/ports/UPDATING regarding pkg-config.
# vi /usr/ports/UPDATING
# sudo portupgrade -fo devel/pkgconf pkg-config-\*
Password:
3 - Install msmtp
Install the msmtp port.
# cd /usr/ports/mail/msmtp/
Select only the following options.
[*] OPENSSL Adds support for SSL (Secure Socket Layer)
[*] IDN Enable Internationalized Domain Names
# sudo make config
Password:
# sudo make
Password:
# sudo make install
Password:
# sudo make clean
Password:
4 - Msmtp configuration
Create your own configuration file. Here is an example that uses a Gmail
account which utilizes TLS.
account default
host smtp.googlemail.com
port 587
from testuser@gmail.com
tls on
tls_starttls on
tls_trust_file /usr/local/etc/ca-bundle.crt
auth on
user testuser@gmail.com
password **********
syslog LOG_MAIL
# pkg_info -L zabbix2-server-* | grep rc.d
/usr/local/etc/rc.d/zabbix_server
# grep required_files /usr/local/etc/rc.d/zabbix_server
required_files="/usr/local/etc/zabbix2/${name}.conf"
# sudo vi /usr/local/etc/zabbix2/msmtprc
Password:
# id zabbix
uid=122(zabbix) gid=122(zabbix) groups=122(zabbix)
# sudo chown zabbix:zabbix /usr/local/etc/zabbix2/msmtprc
Password:
# sudo chmod 600 /usr/local/etc/zabbix2/msmtprc
Password:
5 - Shell script
Modify the Zabbix server configuration to have include the alert script path.
AlertScriptsPath=/usr/local/etc/zabbix2/zabbix/alertscripts
# sudo vi /usr/local/etc/zabbix2/zabbix_server.conf
Password:
# sudo /usr/local/etc/rc.d/zabbix_server restart
Password:
# sudo /usr/local/etc/rc.d/zabbix_server status
Password:
zabbix_server is running as pid 28283 28284 28285 28286 28287 28288 28289 28290
28291 28292 28293 28294 28295 28296 28297 28298 28299 28300 28301 28302 28303
28304 28305 28306 28307 28308 28309.
Here is shell script that can be used in Zabbix to send email notifications.
#!/bin/sh
printf=/usr/bin/printf
from="testuser@gmail.com"
recipient="$1"
subject="$2"
body="$3"
msmtp=/usr/local/bin/msmtp
msmtp_config=/usr/local/etc/zabbix2/msmtprc
$printf "From: $from\nTo: $recipient\nSubject: $subject\n\n$body" | $msmtp \
--file=$msmtp_config -t
exit 0
# sudo vi /usr/local/etc/zabbix2/zabbix/alertscripts/zabbix_notifications.sh
Password:
# sudo chown root:wheel /usr/local/etc/zabbix2/zabbix/alertscripts/zabbix_notifications.sh
Password:
# sudo chmod 555 /usr/local/etc/zabbix2/zabbix/alertscripts/zabbix_notifications.sh
Password:
6 - Zabbix configuration
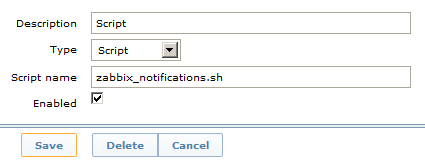
Log into the Zabbix website as a user with Administrator privileges. Hover over
Administration and click on Media types. Click on Create media type on the
right-hand side of the screen. Type in the following and click on Save.
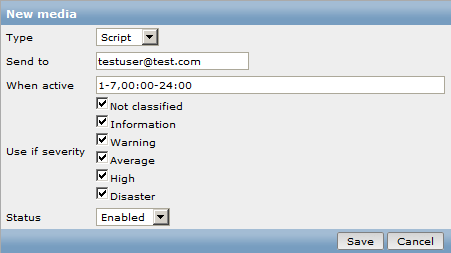
 Hover over Administration and click on Users. Select Users from the drop-down
menu on the right-hand side of the screen. Select the user. Click on the Media
tab and click on Add. Type in the following.
Hover over Administration and click on Users. Select Users from the drop-down
menu on the right-hand side of the screen. Select the user. Click on the Media
tab and click on Add. Type in the following.
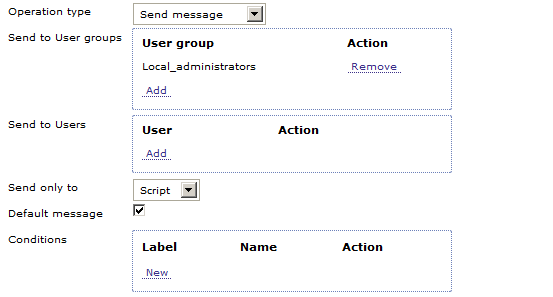
 Hover over Configuration and click on Actions. Select one of the Actions listed
and go to the Operations tab and click on Edit. In the drop-down box next to
Send only to, select Script. Make sure to save the Action.
Hover over Configuration and click on Actions. Select one of the Actions listed
and go to the Operations tab and click on Edit. In the drop-down box next to
Send only to, select Script. Make sure to save the Action.
|
